Price intelligence with Python: Scrapy, SQL, and Pandas
In this article, I will guide you through a web scraping and data visualization project. We will extract e-commerce data from real e-commerce websites then try to get some insights out of it. The goal of this article is to show you how to get product pricing data from the web and what are some ways to analyze pricing data. We will also look at how price intelligence makes a real difference for e-commerce companies for smarter price intelligence decisions.
This is the simple process we are going to follow for this article:
- Identify data sources and fields
- Extract and store data
- Analyze data
Identify data sources and fields
Websites
In a real-life project, you’d probably know which websites you want to get data from. For this article, I’m choosing some popular European e-commerce stores.
Fields to scrape
When scraping product information we have an endless amount of data types we could get from an e-commerce site: product name, product-specific attributes, price, stock, reviews, category, etc. For now, we will focus on four fields that have the potential to give us the most interesting insights:
- product name
- price
- stock
- category
See how we at Zyte structure product data.
Ethical web scraping
Before we start writing code to extract data from any website, it’s important to make sure we are scraping ethically. First, we should check the robots.txt file and see if it allows us to visit the pages we want to get data from.
Example robots.txt:
User-agent: *
Disallow: /

User-Agent: *
Disallow: /*.json
Disallow: /api
Disallow: /post
Disallow: /submit
Allow: /
Some things you could do to be compliant:
- Respect the rules
- Adjust crawling speed if needed
- Identify yourself with a UserAgent
- Do not harm the website
Extract and store data
This is the part where we extract the data from the website. We’re going to use several modules of the Scrapy framework like Item, ItemLoader, and pipeline. We want to make sure that the output is clean so we can insert it into a database for later analysis.
Installing Scrapy
We are using Scrapy, the web scraping framework for this project that will help you better understand price intelligence. It is recommended to install Scrapy in a virtual environment so it doesn’t conflict with other system packages.
Create a new folder and install virtualenv:
mkdir ecommerce
cd ecommerce
pip install virtualenv
virtualenv env
source env/bin/activate
Install Scrapy:
pip install scrapy
If you’re having trouble with installing scrapy check out the installation guide.
Create a new Scrapy project
Now that we have Scrapy installed in our environment we can create a new Scrapy project:
scrapy startproject ecommerce
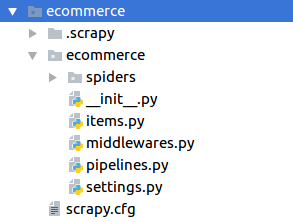
This will generate the file structure:

Items
Before we can write the spiders for each website, we have to create an item in the items file which contains the previously defined data fields. Remember, since this project is related to price intelligence then it is important how you define and represent your data fields. One item will represent one product and hold all its data.
class ProductItem(Item):
   product = Field()
   price = Field()
   category = Field()
   stock = Field()
Spider
Each of our spiders will look the same except the selectors of course.
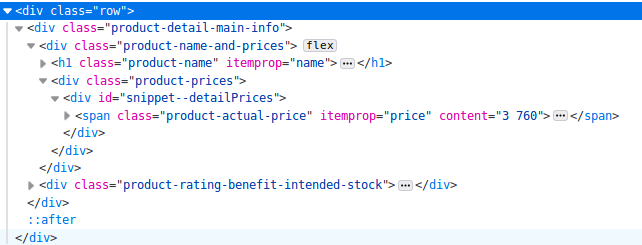
To create a spider, first, we should look at the website and its source code, for example:

This is the HTML of one e-commerce website I’m scraping and this part contains the key ingredients that will follow for price intelligence analysis, which are the name and price information. One thing to look out for is the itemprop attribute. Many e-commerce sites use this schema. In the source code above we have itemprop=”name” which contains the product name and itemprop=”price” which contains the product price.
Selecting data fields based on itemprop attributes gives us a better chance that the scraper won’t break in the future when the website layout changes.
class Ecommerce(Spider):
   name = "ecommerce"
   start_urls = ["example.com/products/1", "example.com/products/2", "example.com/products/3", ]

   def parse(self, response):
       item_loader = ItemLoader(item=ProductItem(), response=response)
       item_loader.default_input_processor = MapCompose(remove_tags)

       item_loader.add_css("product", "h1[itemprop='name']")
       item_loader.add_css("price", "span[itemprop=price]")
       item_loader.add_css("stock", "span[itemprop=’stock’]")
       item_loader.add_css("category", "a[data-track='Breadcrumb']")

       return item_loader.load_item()
I’m using ItemLoader with a default input processor to remove HTML tags. As you can see, I’m selecting the category field from the breadcrumb.
Creating a data pipeline
If we want to run an analysis of our data we need to store it in some kind of database. For this price intelligence project, I’m using a MySQL database for storage. If you want to use MySQL as well you should install MySQL-python if it isn’t already installed:
sudo pip install MySQL-python
Then in Scrapy, we create a new class called DatabasePipeline in the pipelines.py file:
class DatabasePipeline:
       def process_item(self, item, spider):
    	   return item
In this class we have several things to do:
- Add database connection parameters in the constructor
- Implement from_crawler method and get database connection info from settings.py
- Connect to the database when the spider starts
- Insert data records into the database (one item at a time)
- When all done close the database connection
class DatabasePipeline:
       # Add database connection parameters in the constructor
       def __init__(self, db, user, passwd, host):
    	      self.db = db
    	      self.user = user
    	      self.passwd = passwd
    	      self.host = host
       # Implement from_crawler method and get database connection info from settings.py
       @classmethod
       def from_crawler(cls, crawler):
    	      db_settings = crawler.settings.getdict("DB_SETTINGS")
    	      if not db_settings:
                  raise NotConfigured
    	      db = db_settings['db']
    	      user = db_settings['user']
    	      passwd = db_settings['passwd']
    	      host = db_settings['host']
    	      return cls(db, user, passwd, host)
       # Connect to the database when the spider starts
       def open_spider(self, spider):
    	      self.conn = MySQLdb.connect(db=self.db,
                            user=self.user, passwd=self.passwd,
                            host=self.host,
                            charset='utf8', use_unicode=True)
    	      self.cursor = self.conn.cursor()
       # Insert data records into the database (one item at a time)
       def process_item(self, item, spider):
    	      sql = "INSERT INTO table (field1, field2, field3) VALUES (%s, %s, %s)"
    	      self.cursor.execute(sql,
                             (
                             item.get("field1"),
                             item.get("field2"),
                             item.get("field3"),
                             )
                             )
    	      self.conn.commit()
    	      return item
	# When all done close the database connection
        def close_spider(self, spider):
    	       self.conn.close()
For effective price intelligence, technically, you could also hardcode your database connection info in the pipeline but I suggest putting it into the settings file like this:
DB_SETTINGS = {
 	'db': "my_db",
 	'user': 'root',
 	'passwd': 'my_pass',
 	'host': '0.0.0.0',
 }
Now we only have to activate this pipeline in the settings file:
ITEM_PIPELINES = {
   'ecommerce.pipelines.DatabasePipeline: 300,
}
Price intelligence
We have focused on how to extract e-commerce pricing data now let’s look at some basic ways you can analyze it and get actionable insights. This is essentially Price Intelligence.
In this section, I’m going to introduce some basic ways to analyze price data and how to get actionable insights from it. I’m using pandas and SQL queries on the backend to get the data from the database. To generate the charts on the front end, I’m using Google Charts.
Price history
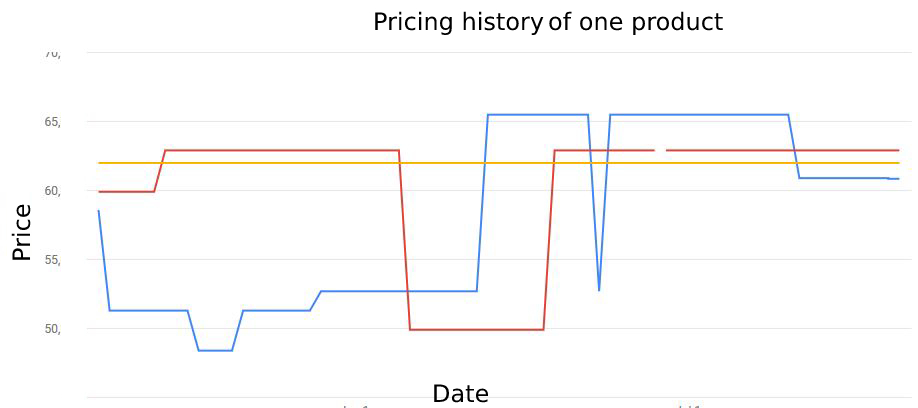
When it comes to price intelligence, one important analysis is the price history of one product. It shows you how one product was priced in the past. This could be one way to help determine the pricing strategy of an e-commerce store. Obviously, for this, you need to scrape their data regularly for a longer time. But when you actually have access to the data you can see how their pricing has changed or not changed in the past. It’s also interesting to see what pricing strategy they use on important shopping days like Black Friday.

The following should give you a better understanding of what is meant by price intelligence.
If you look at the history chart above, you can have a good understanding of how you and your competitors set the prices for one product. Based on the past you could forecast how the competitors will change their prices in the future so you can adjust your strategy to prepare for it.
Stock
One of the key factors when shopping online is the availability of the chosen product. Maybe I’m willing to wait a week or two till the product I want to buy is in stock again but most of the time I want it in my hands as soon as possible and maybe even pay a little more as well just to get it faster.

To use the dynamic of smart price intelligence to our advantage, we can scrape the stock information from the product page and get alerted if all of our competitors are out of the given product so we can increase the price.
Price comparison
On a day-to-day basis, maybe the best insight price intelligence can give us is the overall view on the market and how our products fit in. Without web scraping, we would have a hard time knowing how our main competitors are pricing the same products as we sell.

Price position
On a higher level, we can analyze how many of our products are priced lower, the same, or higher than each of the competitors. On the chart below, we have 34 products that have a higher price than competitor3 and 9 products with lower price than competitor5. As you can see, this is a key component for price intelligence.

For example, we might want to position ourselves to have higher prices than one of our competitors or we want to be lower than another one. This kind of price intelligence analysis can help you adjust prices accordingly.
Category analysis
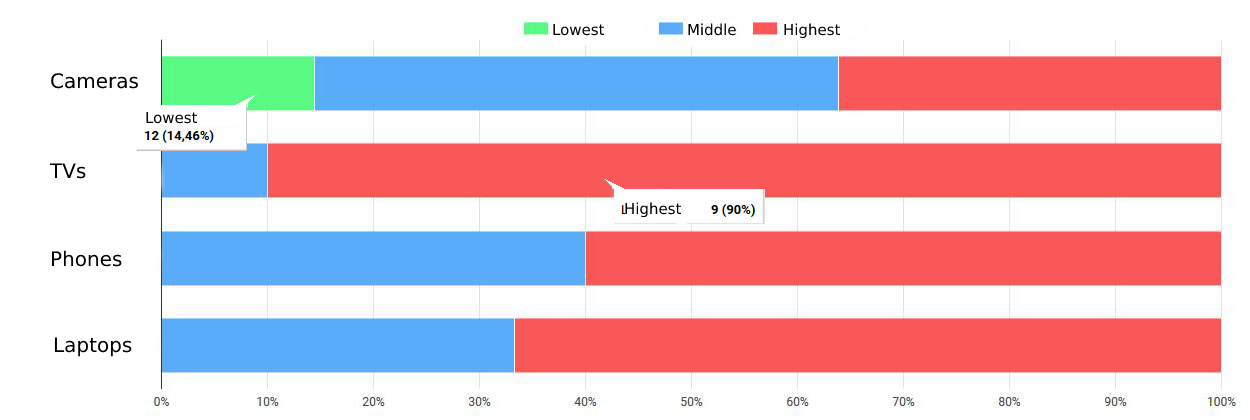
When we were writing the spider we extracted the category of the products as well. This way we can also group together products based on category.

This chart shows what our price position is compared to the competitors in each product category. As you can see, here we have 12 products in the “Cameras” category where we have the lowest price. In the other categories, we are either in the middle or highest price position.
Wrapping up
So this is the process of effective price intelligence so you can scrape e-commerce websites and get actionable insights from the data using python and some visualization. First, you plan what data fields you exactly need and from what websites. Second, you create web spiders to extract and store the data. (If you don’t want to struggle with selectors/XPath, use an AI-based web scraping tool, like Zyte Automatic Extraction (formerly AutoExtract)). Finally, you visualize the data to understand it and find business opportunities, which comes to the definition of price intelligence.
If you have an eCommerce data-driven product and you need help with data extraction, contact us here
